Disable apt pager
21 Dec 2024echo 'Binary::apt::Pager "false";' > /etc/apt/apt.conf.d/96-nopager
chmod a+r /etc/apt/apt.conf.d/96-nopager
echo 'Binary::apt::Pager "false";' > /etc/apt/apt.conf.d/96-nopager
chmod a+r /etc/apt/apt.conf.d/96-nopager
I reversed the firmware updater of my Toshiba HDD to be able to update it on Linux. The following commands should work, USE AT YOUR OWN RISK:
$ wget https://www.canvio.jp/en/support/download/hdd/ot_ihdd/fw/ISFw.dat
$ grep -C2 MODELNAME ISFw.dat
 # ^
 # |___ identify the right filename here
$ wget https://www.canvio.jp/en/support/download/hdd/ot_ihdd/fw/sk060202.ftd
# hdparm --fwdownload-mode3 sk060202.ftd /dev/sdX
I bought a Toshiba HDWG480 HDD for my NAS. hdparm -I /dev/XXX gives the following output:
ATA device, with non-removable media
        Model Number:       TOSHIBA HDWG480
        Serial Number:      3430A00RFR0H
        Firmware Revision:  0601
        Transport:          Serial, ATA8-AST, SATA 1.0a, SATA II Extensions, SATA Rev 2.5, SATA Rev 2.6, SATA Rev 3.0
Standards:
        Used: unknown (minor revision code 0x006d)
        Supported: 10 9 8 7 6 5
        Likely used: 10
[...]
As usual, I wanted to check if any firmware update is available. Toshiba’s dedicated webpage lists version 0602 as available for my model.
Unfortunately, as expected, there’s no firmware update process provided for Linux users, only an “Internal Storage Firmware Update Utility” is provided for Windows.
Update files are not provided either.
So, our goals are:
Running the installer1 with Wine works perfectly, resulting in the following files being installed under Program Files (x86):
  18312 ISFw.exe:        PE32 executable (native) Intel 80386, for MS Windows, 4 sections
2434952 TosISFw.exe:     PE32 executable (GUI) Intel 80386, for MS Windows, 5 sections
2172296 TosISFwSvc.exe:  PE32 executable (GUI) Intel 80386, for MS Windows, 5 sections
2362248 TosISFwTray.exe: PE32 executable (GUI) Intel 80386, for MS Windows, 5 sections
A quick look (filename, imports) hints at the following goals for each program:
ISFW.exe is a driver (DriverEntry export), probably in charge of effectively flashing the update.TosISFw.exe is the GUITosISFwSvc.exe is the userland service (as the service related imports show)TosISFwTray.exe most probably handles a tray iconThe obvious move is too grep for URLs in the various installed binaries. Unfortunately, it leads nowhere apart from URLs related to the digital signatures. However, grepping for HttpOpenRequest, an API often used by Windows programs to download files, gives two results: TosISFw.exe and TosISFwSvc.exe.
Let’s look at TosISFwSvc.exe which is smaller and let’s see if we can find the URL by checking the xrefs.
The call is in the function at 0x00401040, and looks like this:
v15 = HttpOpenRequestW(v14, L"GET", &v36[(_DWORD)lpBuffer], 0, (LPCWSTR)szReferrer, 0, 0x84000000, 0);
the function is obviously a “download” helper, as all the API calls show. Let’s rename it dlfile. There are only two Xrefs to dlfile:
if ( !RegOpenKeyExW(
        HKEY_LOCAL_MACHINE,
        L"SYSTEM\\CurrentControlSet\\Services\\TosISFwSvc",
        0,
        0x20019u,
        &phkResult)
  && readregstring((LPBYTE)&String, &phkResult, L"FwURL")
  && lstrlenW(&String) )
{
  sub_401000();
  LOBYTE(v47) = 2;
  if ( dlfile(&String, (int)v38) )


[...]

sub_4052E0(&lpValueName, L"%s%d", L"URL", phkResult);
v25 = 0;
if ( !RegOpenKeyExW(
        HKEY_LOCAL_MACHINE,
        L"SYSTEM\\CurrentControlSet\\Services\\TosISFwSvc",
        0,
        0x20019u,
        &v25)
  && readregstring((LPBYTE)&String, &v25, lpValueName)
  && lstrlenW(&String)
  && dlfile(&String, (int)v36) )
The first one gives us our answer: the URL is stored in the registry. It’s actually written by the InstallShield setup.
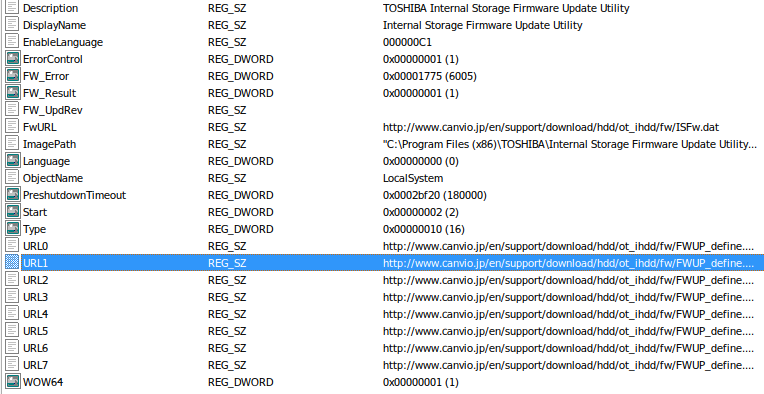
The value is http://www.canvio.jp/en/support/download/hdd/ot_ihdd/fw/ISFw.dat
The file is an ini file, which is trivial to read and parse:
[VERS]
VERSION="20240513"
[Firmware]
0000=qa060378.ftd
0000model="TOSHIBA HDWG21E"
0000rev="0603"
0000rev0000="0601"
0000native=0
0000option=0
0001=qa060378.ftd
0001model="TOSHIBA HDWG21C"
0001rev="0603"
0001rev0000="0601"
0001native=0
0001option=0
[...]
0008=sk060202.ftd
0008model="TOSHIBA HDWG480 "
0008rev="0602"
0008rev0000="0601"
0008native=0
0008option=0
[...]
; 905CBD24
in my case, the drive is number 8. What’s interesting is the checksum at the end. It’s the CRC32 of the file, minus the last 10 bytes, which can be easily checked with the slice and crc32 tools of my hacking Swiss army knife rsbkb:
$ slice -- ISFw.dat 0 -10 | crc32
905cbd24
Now obviously, let’s try to download the relevant file:
$ wget https://www.canvio.jp/en/support/download/hdd/ot_ihdd/fw/sk060202.ftd
Resolving www.canvio.jp (www.canvio.jp)... 23.72.248.205, 23.72.248.202
Connecting to www.canvio.jp (www.canvio.jp)|23.72.248.205|:443... connected.
HTTP request sent, awaiting response... 200 OK
Length: 1171456 (1.1M)
[...]
Just for fun we can check if cpu_rec_rs can identify any code in the binary:
$ ~/tools/cpu_rec_rs/cpu_rec_rs sk060202.ftd
Loading corpus from "/home/trou/tools/cpu_rec_rs/cpu_rec_corpus/*.corpus"
-------------------------------------------------
    File     |   Range    | Detected Architecture
-------------------------------------------------
sk060202.ftd | Whole file | ARMhf
-------------------------------------------------
So the firmware is probably running on an ARM SoC (it is).
Now, how is the file sent to the drive to actually perform the update? Recall that we have 4 binaries and we saw the ISFW.exe is actually a driver.
The DriverEntry function is actually extremely simple:
NTSTATUS __stdcall DriverEntry(PDRIVER_OBJECT DriverObject, PUNICODE_STRING RegistryPath)
{
  int v2; // eax

  readregistry();
  v2 = flashfirmware();
  sub_1001812(v2 % 100 == 0, 1, v2);
  return NtTerminateProcess((HANDLE)0xFFFFFFFF, 0);
}
I’ve already renamed readregistry and flashfirmware as the functions are easy to identify:
char readregistry()
{
  [...]
  RtlInitUnicodeString(&DestinationString, L"\\REGISTRY\\MACHINE\\SYSTEM\\CurrentControlSet\\Services\\TosISFwSvc");
  [...]
  if ( NtOpenKey(&KeyHandle, 0x20019u, &ObjectAttributes) >= 0 )
  {
    RtlInitUnicodeString(&ValueName, L"FW_Serial");
    if ( NtQueryValueKey(KeyHandle, &ValueName, KeyValuePartialInformation, KeyValueInformation, 0x800u, &ResultLength) >= 0 )
    {
      memcpy(&fwserial, &KeyValueInformation[3], KeyValueInformation[2]);
       [...]
       RtlInitUnicodeString(&ValueName, L"FW_CurRev");
       memcpy(&fw_cur, &KeyValueInformation[3], KeyValueInformation[2]);
        [...]
        RtlInitUnicodeString(&ValueName, L"FW_NewRev");
        memcpy(fw_new, &KeyValueInformation[3], KeyValueInformation[2]);
          [...]
          RtlInitUnicodeString(&ValueName, L"FW_Model");
          memcpy(fw_model, &KeyValueInformation[3], KeyValueInformation[2]);
            [...]
            RtlInitUnicodeString(&ValueName, L"FW_FWFile");
            wmemcpy(path, L"\\??\\", 4);
            memcpy(&path + 4, &KeyValueInformation[3], KeyValueInformation[2]);
  [...]
}
Registry values (set by TosISFwSvc.exe) are read and copied into global variables, which I renamed according the registry value name.
Here’s the start of flashfirmware:
int flashfirmware()
{
  [...]
  Handle = 0;
  fwdata = 0;
  fwsize = 0;
  memset(&drivedata, 0, sizeof(drivedata));
  printf(L"%s Firmware: %s -> %s\n", fw_model, &fw_cur, fw_new);
  printf(L"DO NOT TURN OFF THE PC WHILE ANY FIRMWARE UPDATE IS RUNNING.\n");
  printf(
    L"Your device may become unusable if you do this and Toshiba is not \n"
     "responsible for any damage, including any necessary replacement of \n"
     "the unit, caused by your doing so.\n");
  HeapHandle = RtlCreateHeap(2u, 0, 0, 0, 0, 0);
  if ( HeapHandle )
  {
    status = readfile(&path, &fwdata, &fwsize);
    if ( !(status % 100) )
    {
      Handle = verifydisk(&fwserial, &fw_cur, fw_model, &drivedata);
[...]
verifydisk is very important, yet relatively simple (with everything already renamed):
HANDLE __stdcall verifydisk(PCWSTR serial, PCWSTR cur, WCHAR *model, IDENTIFY_DEVICE_DATA *devdata)
{
  HANDLE hdl; // edi
  UNICODE_STRING cur_; // [esp+10h] [ebp-104h] BYREF
  struct _UNICODE_STRING serial_; // [esp+18h] [ebp-FCh] BYREF
  UNICODE_STRING model_from_drive_u; // [esp+20h] [ebp-F4h] BYREF
  UNICODE_STRING serial_from_drive_u; // [esp+28h] [ebp-ECh] BYREF
  UNICODE_STRING model_; // [esp+30h] [ebp-E4h] BYREF
  UNICODE_STRING fwrev_from_drive_u; // [esp+38h] [ebp-DCh] BYREF
  DWORD *drivenumber; // [esp+40h] [ebp-D4h]
  HANDLE hdl_; // [esp+44h] [ebp-D0h]
  char v14; // [esp+4Bh] [ebp-C9h] BYREF
  WCHAR model_from_drive[50]; // [esp+4Ch] [ebp-C8h] BYREF
  WCHAR serial_from_drive[30]; // [esp+B0h] [ebp-64h] BYREF
  WCHAR fwrev_from_drive[18]; // [esp+ECh] [ebp-28h] BYREF

  [...]
  for ( drivenumber = 0; (unsigned int)drivenumber < 0x20; drivenumber = (DWORD *)((char *)drivenumber + 1) )
  {
    [...]
    hdl = opendrive((char)drivenumber);
    if ( !hdl )
      break;
    if ( !getdevprop(hdl, &bustype) || bustype == BusTypeUsb ) {
      NtClose(hdl);
    } else {
      if ( get_IDENTIFY_DEVICE_DATA(hdl_, devdata, 0x200u) ) {
        get_drive_serial(devdata, serial_from_drive, 30, 1);
        get_drive_fw_rev(devdata, fwrev_from_drive, 18, 1);
        get_drive_model(devdata, model_from_drive, 50, 1);
        RtlInitUnicodeString(&serial_from_drive_u, serial_from_drive);
        RtlInitUnicodeString(&fwrev_from_drive_u, fwrev_from_drive);
        RtlInitUnicodeString(&model_from_drive_u, model_from_drive);
        if ( RtlEqualUnicodeString(&serial_, &serial_from_drive_u, 0) )
        {
          if ( RtlEqualUnicodeString(&cur_, &fwrev_from_drive_u, 0)
            && RtlEqualUnicodeString(&model_, &model_from_drive_u, 0) )
          {
            return hdl_;
          }
        }
      }
      NtClose(hdl_);
    }
  }
  return 0;
}
Let’s dive into the opendrive and getdevprop functions:
HANDLE __stdcall opendrive(char Args)
{
  [...]
  HANDLE FileHandle; // [esp+30h] [ebp-88h] BYREF
  WCHAR SourceString[64]; // [esp+34h] [ebp-84h] BYREF

  DestinationString.Length = 0;
  *(_DWORD *)&DestinationString.MaximumLength = 0;
  HIWORD(DestinationString.Buffer) = 0;
  memset(SourceString, 0, sizeof(SourceString));
  FileHandle = 0;
  wsprintf(SourceString, 64, (wchar_t *)L"\\??\\PhysicalDrive%u", Args);
  RtlInitUnicodeString(&DestinationString, SourceString);
  [...]
  NtOpenFile(&FileHandle, 0x100003u, &ObjectAttributes, &IoStatusBlock, 3u, 0x20u);
  return FileHandle;
}

char __stdcall getdevprop(HANDLE hdl, char *bustype)
{
  char tmp; // al
  struct _IO_STATUS_BLOCK IoStatusBlock; // [esp+Ch] [ebp-1018h] BYREF
  char *bustype_; // [esp+14h] [ebp-1010h]
  HANDLE FileHandle; // [esp+18h] [ebp-100Ch]
  char retvalue; // [esp+1Fh] [ebp-1005h]
  STORAGE_DEVICE_DESCRIPTOR InputBuffer; // [esp+20h] [ebp-1004h] BYREF

  FileHandle = hdl;
  bustype_ = bustype;
  IoStatusBlock.Status = 0;
  IoStatusBlock.Information = 0;
  retvalue = 0;
  memset(&InputBuffer, 0, 0x1000u);
  if ( NtDeviceIoControlFile( hdl, 0, 0, 0, &IoStatusBlock,
        IOCTL_STORAGE_QUERY_PROPERTY,
         &InputBuffer, 0x1000u, &InputBuffer, 0x1000u) < 0 ) {
    tmp = 0;
  } else {
    tmp = InputBuffer.BusType;
    retvalue = 1;
  }
  if ( bustype_ )
    *bustype_ = tmp;
  return retvalue;
}
opendrive returns a handle on a given PhysicalDrive, which is then used by getdevprop’s NtDeviceIoControlFile.
Using IDA’s “standard enums”, I remapped 0x2D1400 to its readable definition: IOCTL_STORAGE_QUERY_PROPERTY.
As InputBuffer is set to 0 before the call, the returned data is a STORAGE_DEVICE_DESCRIPTOR structure, which is used by verifydisk to verify if the drive is connected through USB (BusTypeUsb) and bails out if that’s the case.
get_IDENTIFY_DEVICE_DATA is then called by verifydisk:
char __stdcall get_IDENTIFY_DEVICE_DATA(HANDLE hdl, void *buff, size_t Size)
{
  struct _IO_STATUS_BLOCK IoStatusBlock; // [esp+Ch] [ebp-3Ch] BYREF
  HANDLE FileHandle; // [esp+14h] [ebp-34h]
  char v6; // [esp+1Bh] [ebp-2Dh]
  ATA_PASS_THROUGH_DIRECT InputBuffer; // [esp+1Ch] [ebp-2Ch] BYREF

  FileHandle = hdl;
  IoStatusBlock.Status = 0;
  v6 = 0;
  IoStatusBlock.Information = 0;
  memset(buff, 0, Size);
  memset(&InputBuffer, 0, sizeof(InputBuffer));
  InputBuffer.Length = 0x28;
  InputBuffer.AtaFlags = ATA_FLAGS_DRDY_REQUIRED|ATA_FLAGS_DATA_IN|ATA_FLAGS_NO_MULTIPLE;
  InputBuffer.DataTransferLength = Size;
  InputBuffer.TimeOutValue = 10;
  InputBuffer.DataBuffer = buff;
  InputBuffer.CurrentTaskFile[reg_Command] = 0xEC;
  if ( NtDeviceIoControlFile(hdl, 0, 0, 0, &IoStatusBlock,
         IOCTL_ATA_PASS_THROUGH_DIRECT,
         &InputBuffer, 0x28u, &InputBuffer, 0x28u) >= 0
    && (InputBuffer.CurrentTaskFile[reg_Status] & 9) == 0 )
  {
    return 1;
  }
  return v6;
}
NtDeviceIoControlFile is now used with IOCTL_ATA_PASS_THROUGH_DIRECT, which as the name implies, sends a raw ATA command to the drive. Actually understanding the request is a bit complex as the ATA_PASS_THROUGH_DIRECT structure specifies both data buffers and “registers” through the CurrentTaskFile field.
CurrentTaskFile is an array used to index 8 registers, both as input and output. Using the documentation, we can create two enums to use in IDA:
enum ATA_INPUT_REGISTERS : __int32
{
  reg_Features = 0x0,
  reg_Sector_Count_in = 0x1,
  reg_Sector_Number_in = 0x2,
  reg_Cylinder_Low_in = 0x3,
  reg_Cylinder_High_in = 0x4,
  reg_Device_Head_in = 0x5,
  reg_Command = 0x6,
  reg_Reserved = 0x7,
};

enum ATA_OUTPUT_REGISTERS : __int32
{
  reg_Error = 0x0,
  reg_Sector_Count_out = 0x1,
  reg_Sector_Number_out = 0x2,
  reg_Cylinder_Low_out = 0x3,
  reg_Cylinder_High_out = 0x4,
  reg_Device_Head_out = 0x5,
  reg_Status = 0x6,
  reg_Reserved_out = 0x7,
};
So the command here is 0xEC. The ATA/ATAPI command set specification, found here, describes the IDENTIFY DEVICE – ECh, PIO Data-In command, which returns a lot of data. Thankfully, Microsoft gives us the IDENTIFY_DEVICE_DATA structure which has everything.
The following code then verify we have the “right” drive by comparing the serial, model and firmware version from the returned data to the ones stored in the registry.
int __stdcall get_drive_serial(IDENTIFY_DEVICE_DATA *drivedata, wchar_t *dest, int destlen, char stripflag)
{
  return (int)getdrive_data_string( drivedata, dest, destlen,
                offsetof(IDENTIFY_DEVICE_DATA, SerialNumber), 20,
                stripflag);
}

  [...]
  get_drive_serial(devdata, serial_from_drive, 30, 1);
  [...]
  RtlInitUnicodeString(&serial_from_drive_u, serial_from_drive);
  [...]
  if ( RtlEqualUnicodeString(&serial_, &serial_from_drive_u, 0) )
        {
          if ( RtlEqualUnicodeString(&cur_, &fwrev_from_drive_u, 0)
            && RtlEqualUnicodeString(&model_, &model_from_drive_u, 0) )
Once the driver has identified and verified the disk is actually flashable, it proceeds with the actual update:
[...]
      MaxBlocksPerDownloadMicrocodeMode03 = drivedata.MaxBlocksPerDownloadMicrocodeMode03;
      if ( !drivedata.MaxBlocksPerDownloadMicrocodeMode03 || drivedata.MaxBlocksPerDownloadMicrocodeMode03 == 0xFFFF ) {
        MaxBlocksPerDownloadMicrocodeMode03 = 128;
      } else if ( drivedata.MaxBlocksPerDownloadMicrocodeMode03 >= 0x80u ) {
        MaxBlocksPerDownloadMicrocodeMode03 = 128;
      }
      if ( MaxBlocksPerDownloadMicrocodeMode03 >= drivedata.MinBlocksPerDownloadMicrocodeMode03
        && MaxBlocksPerDownloadMicrocodeMode03 ) {
        fwblocks = fwsize >> 9;
        fwblocks2 = fwsize >> 9;
        v1 = 60;
        do {
          printprogress();
          wait((LARGE_INTEGER)500LL);
          --v1;
        } while ( v1 );
        for ( fwsize = 0; (int)fwsize < 30; ++fwsize ) {
          currentblock = 0;
          status = 6000;
          if ( fwblocks ) {
            fwdata1 = fwdata;
            MaxBytesPerDL = MaxBlocksPerDownloadMicrocodeMode03 << 9;
            while ( 1 ) {
              printprogress();
              blocks_to_flash = fwblocks2 - currentblock;
              if ( MaxBlocksPerDownloadMicrocodeMode03 < fwblocks2 - currentblock )
                blocks_to_flash = MaxBlocksPerDownloadMicrocodeMode03;
              if ( !ATA_CMD_DOWNLOAD_MICRO(Handle, currentblock, blocks_to_flash, fwdata1) )
                break;
              currentblock += MaxBlocksPerDownloadMicrocodeMode03;
              fwdata1 += MaxBytesPerDL;
              if ( currentblock >= fwblocks2 )
                goto LABEL_25;
            }
            status = 6009;
LABEL_25:
            fwblocks = fwblocks2;
          }
          if ( !(status % 100) )
            break;
          v5 = 2;
          do {
            printprogress();
            wait((LARGE_INTEGER)500LL);
            --v5;
          } while ( v5 );
        }
        if ( !(status % 100) )
        {
          if ( get_IDENTIFY_DEVICE_DATA(Handle, &drivedata, 0x200u) ) {
            get_drive_fw_rev(&drivedata, newfwrev, 18, 1);
            if ( wcsncmp(fw_new, newfwrev, wcslen(fw_new)) )
              status = 6011;
          } else {
            status = 6010;
          }
        }
      } else {
LABEL_35:
        status = 6006;
      }
  [...]
  if ( status % 100 )
    printf(L"Update Failed.      \n");
  else
    printf(L"Update Succeeded.   \n");
As you can see, the updater verifies an interesting field from the drive information data: MaxBlocksPerDownloadMicrocodeMode03. Let’s check what this means.
The following excerpt from the ATA command set describes the meaning of the field:
A.11.5.3.4 DM MAXIMUM TRANSFER SIZE field
If:
a) the value of the DM MAXIMUM TRANSFER SIZE field (see table A.30) is greater than zero;
b) the value of the DM MAXIMUM TRANSFER SIZE field is less than FFFFh;
c) the DOWNLOAD MICROCODE SUPPORTED bit (see A.11.5.2.20) is set to one or the DOWNLOAD MICROCODE DMA SUPPORTED bit (see A.11.5.2.6) is set to one; and
d) the DM OFFSETS DEFERRED SUPPORTED bit (see A.11.5.3.1) is set to one, or the DM OFFSETS IMMEDIATE
SUPPORTED bit (see A.11.5.3.3) is set to one, then the DM MAXIMUM TRANSFER SIZE field indicates the maximum number of 512-byte data blocks permitted by a DOWNLOAD MICROCODE command (see 7.7) or a DOWNLOAD MICROCODE DMA command (see 7.8) that specifies a subcommand of:
a) Download with offsets and save microcode for immediate and future use (i.e., 03h); or
b) Download with offsets and save microcode for future use (i.e., 0Eh).
Otherwise, no maximum is indicated (i.e., there is no maximum number of 512-byte data blocks).
The IDENTIFY DEVICE data contains a copy of the DM MAXIMUM TRANSFER SIZE field (see IDENTIFY DEVICE
data word 235 in table 45).
Of course, we want to check this DOWNLOAD MICROCODE command:
The DOWNLOAD MICROCODE command allows the host to alter the device’s microcode. The data transferred
using the DOWNLOAD MICROCODE command and the DOWNLOAD MICROCODE DMA command is vendor
specific.
[...]
Downloading and activating microcode involves the following steps:
1) download: the host transfers updated microcode data to the device in one or more DOWNLOAD
MICROCODE commands or DOWNLOAD MICROCODE DMA commands;
2) save: after receiving the complete updated microcode data, if specified by the download microcode
mode, then the device shall save the updated microcode data to nonvolatile storage; and
3) activate: the device begins using the saved or deferred microcode data for the first time after an event
specified by the download microcode mode and the saved or deferred microcode data becomes the
active microcode data.

The BLOCK COUNT field specifies the number of 512-byte data blocks that shall be transferred. The BLOCK COUNT
field is specified in the COUNT field and the LBA field (see table 37).
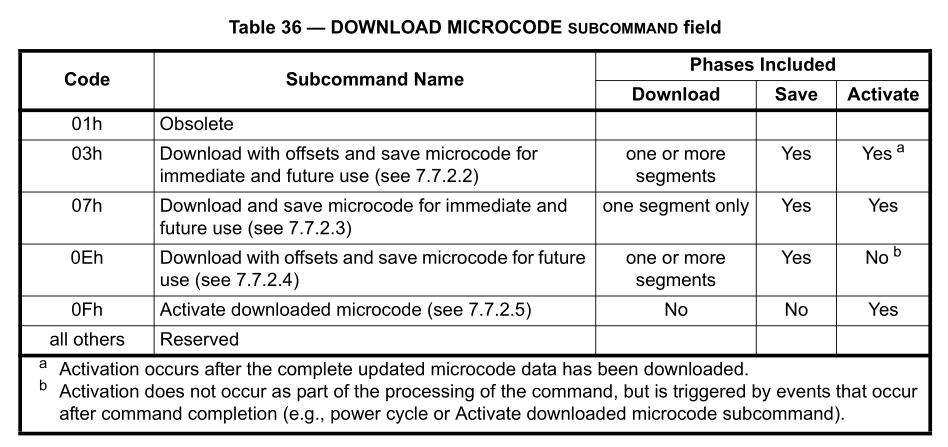
DOWNLOAD Subcommands actually define the update behavior:
char ATA_CMD_DOWNLOAD_MICRO(HANDLE FileHandle, __int16 currentblock, int blocks_to_flash, void *fwdata)
{
  struct _IO_STATUS_BLOCK IoStatusBlock; // [esp+Ch] [ebp-38h] BYREF
  char v6; // [esp+17h] [ebp-2Dh]
  ATA_PASS_THROUGH_DIRECT InputBuffer; // [esp+18h] [ebp-2Ch] BYREF

  IoStatusBlock.Status = 0;
  IoStatusBlock.Information = 0;
  memset(&InputBuffer, 0, sizeof(InputBuffer));
  InputBuffer.Length = 0x28;
  InputBuffer.AtaFlags = ATA_FLAGS_DRDY_REQUIRED|ATA_FLAGS_DATA_OUT|ATA_FLAGS_NO_MULTIPLE;
  *(_WORD *)&InputBuffer.CurrentTaskFile[reg_Sector_Count_in] = blocks_to_flash;// BLOCK COUNT
  *(_WORD *)&InputBuffer.CurrentTaskFile[reg_Cylinder_Low_in] = currentblock;// BUFFER OFFSET
  v6 = 0;
  InputBuffer.DataTransferLength = blocks_to_flash << 9;
  InputBuffer.TimeOutValue = 70;
  InputBuffer.DataBuffer = fwdata;
  InputBuffer.CurrentTaskFile[reg_Features] = 3;// mode 3
  InputBuffer.CurrentTaskFile[reg_Device_Head_in] = 0xE0;// OBSOLETE7|N/A|OBSOLETE5
  InputBuffer.CurrentTaskFile[reg_Command] = IDE_COMMAND_DOWNLOAD_MICROCODE;
  if ( NtDeviceIoControlFile(FileHandle, 0, 0, 0, &IoStatusBlock,
         IOCTL_ATA_PASS_THROUGH_DIRECT,
         &InputBuffer, 0x28u, &InputBuffer, 0x28u) >= 0
    && (InputBuffer.CurrentTaskFile[6] & 9) == 0 )// status
  {
    return 1;
  }
  return v6;
}
As you can see, the ATA_CMD_DOWNLOAD_MICRO just follows the specification. The only weird point is the Device register, which is basically obsolete, but is set to 0xE0.
Just to be sure, I checked hdparm source code to see the value set in the command, and indeed, they also set it to 0xE0, so it’s probably legacy cruft:
enum {
	ATA_USING_LBA		= (1 << 6),
	ATA_STAT_DRQ		= (1 << 3),
	ATA_STAT_ERR		= (1 << 0),
};

    [...]
	r->lob.dev   = 0xa0 | ATA_USING_LBA;
So basically, the updater does:
IDENTIFY DEVICE commandDOWNLOAD MICROCODE commandIDENTIFY DEVICE commandYOLO, I tried on my main NAS drive:
# hdparm -I /dev/sdb | grep Firmware
	Firmware Revision:  0601
# hdparm --fwdownload-mode3 sk060202.ftd --yes-i-know-what-i-am-doing --please-destroy-my-drive /dev/sdb
/dev/sdb:
fwdownload: xfer_mode=3 min=1 max=4224 size=512
...............................................................................................................................................................................................................................................................................................................................................................................................................................................................................................................................................................................................................................................................................................................................................................................................................................................................................................................................................................................................................................................................................................................................................................................................................................................................................................................................................................................................................................................................................................................................................................................................................................................................................................................................................................................................................................................................................................................................................................................................................................................................................................................................................................................................................................................................................................................................................................................
. Done.
# hdparm -I /dev/sdb | grep Firmware
	Firmware Revision:  0602
\o/
Version 1.20.0410, MD5: 7cc7dc301f7b8a45cc56ee25e5707cc2, Date: 2023-12-27 ↩
Since years I’ve raged when my cursor in my bash prompt was incoherent: the blinking rectangle was in one place but deleting chars would delete the wrong ones.
I finally took the time to try to understand what was wrong. Long story short: if the previous command did no end with a newline.
A typical case is when using curl, which by default, outputs the page without
adding a newline at the end. But a simple way to reproduce is to use echo:
trou@valhalla:~$ echo -n test
testtrou@valhalla:~$
But the problem is that it’s not bash’s role to check the output of the last command. Some “modern” shells such as zsh or fish actually do that. But I wanted to find a solution which works everywhere, and bash is the common denominator for most Linux and Unix systems.
I first found a solution which involved writing spaces until the line wraps, but it broke when using a python virtualenv.
The answer on this StackExchange question is actually quite clever: it reads the current cursor position using terminal escape codes and only outputs a newline if we are not in the first column.
The final result for me is:
PS1='${debian_chroot:+($debian_chroot)}\[\e[38;5;111m\]\u@\[\e[92m\]\h\[\e[39m\]$text:\[\e[38;5;86m\]\w\[\e[00m\]\$ '

# https://github.com/dylanaraps/pure-bash-bible#get-the-current-cursor-position
new_line_ps1() {
  local _ y x _
  local RESET="\001\e[0m\002"

  IFS='[;' read -p $'\e[6n' -d R -rs _ y x _
  if [[ "$x" != 1 ]]; then
    printf "\n${RESET}"
  fi
}
One last thing to fix is to avoid mc weird
behaviour (slooooow start) when running with this PS1, by actually disabling
the functionnality when running under mc:
# Don't add newline in mc
if [ -z $MC_SID ]; then
    PS1="\$(new_line_ps1)$PS1"
else
    PS1="[mc]$PS1"
fi
Fish also had a problem, which they worked around with the exact same if.
I replaced my Livebox with a GPON, but recently, Orange reinforced the checks they do on DHCP requests options.
The most important ones are:
The most “challenging” part is having DHCP packets with a CoS value of 6. Various options to achieve this are:
CLASSIFY target of iptables, which does not work as dhclient uses raw socketstc’s skbedit target to change packet contents, which is a bit uglycgroups v1 net_prio target, which is problematic in the long run, as cgroups v1 are deprecated and not really easy to setup “cleanly” on a modern dirstro using systemdLD_PRELOAD with dhclient to set the socket priority to 6 and map to vlan cos using egress-qos-mapAfter fiddling with different options, I finally settled for the last one, using Xavier Guerrin’s code.
interfaces:
auto internet
iface internet inet manual
  pre-up    ip link add link enp3s0 name internet type vlan id 832 egress-qos-map 0:0 6:6
  up SO_PRIORITY_DEBUG=1 SO_PRIORITY_VALUE=6 LD_PRELOAD=/root/so_priority.so/so_priority.so dhclient -v in
ternet
  post-down ip link del internet
Updated dhclient.conf:
option rfc3118-authentication code 90 = string;
option orange code 125 = string;
interface "internet" {
  timeout 60;
  retry 1;
  select-timeout 0;
  send dhcp-client-identifier 01:00:0d:b9:45:7d:96;
  send vendor-class-identifier "sagem";
  send user-class "+FSVDSL_livebox.Internet.softathome.Livebox4";
  # generated with https://jsfiddle.net/kgersen/3mnsc6wy/
2f:61:64:61:79:65:65:70;
  send rfc3118-authentication 00:00:00:00:00:00:00:00:00:00:00:1a:09:00:00:05:58:01:03:41:01:0D:66:74:69:xx:xx:xx:xx:xx:xx:xx:xx:xx:xx:xx:xx:xx:xx:xx:xx:xx:xx:xx:xx:xx:xx:xx:xx:xx:xx:xx:xx:xx:xx:xx:xx:xx:xx:xx:xx:xx:xx:xx:xx:xx:xx:xx:xx:xx:xx
  request subnet-mask, routers,
          domain-name-servers, domain-name,domain-search,
          broadcast-address,
          dhcp-lease-time, dhcp-renewal-time, dhcp-rebinding-time,
          rfc3118-authentication, orange;
}
I bought a GPON LXT-010G-D to replace my Livebox 5, which comes with an integrated ONT, so you cannot use an MC220L easily. Plus, the Sercomm FGS202 that is provided by Orange does not allow you to spoof the necessary information to register on the GPON tree (if I understood things correctly).
The LXT starts with a default IP: 192.168.1.1. To change it, login on the
HTTP interface with adsl / realtek and change the config on the LAN page.
Once this is done you can restart it and connect using Telnet:
Trying 10.0.0.199...
Connected to 10.0.0.199.
Escape character is '^]'.
LXT-010G-D login: adsl
Password:
#
The ONT information is accessible from the Livebox web interface as can be seen in the screenshot:
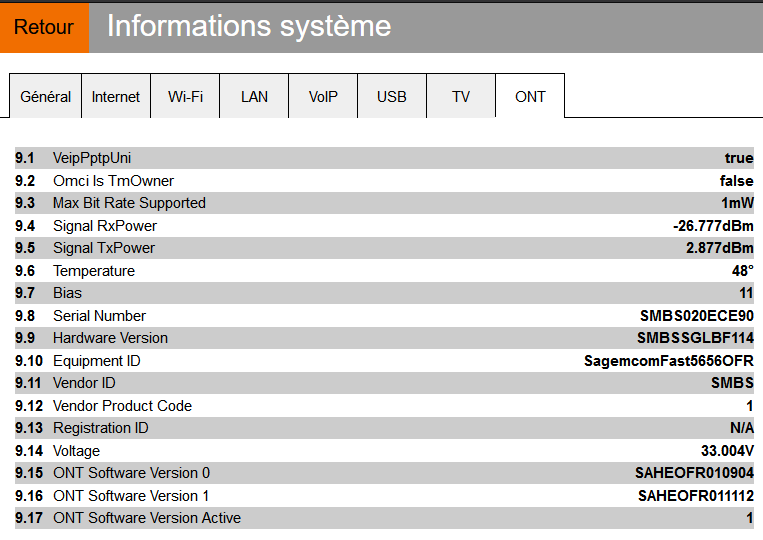
I think I modified (at least) the following parameters (see the references section below for the source):
PON_VENDOR_IDGPON_SNHW_HWVERGPON_ONU_MODELOMCI_SW_VER1OMCI_SW_VER2Using the following commands:
# flash set PON_VENDOR_ID SMBS
PON_VENDOR_ID=SMBS
Everything comes from Vincent Bernat’s page, thanks a lot!
/etc/network/interfaces:
auto enp3s0
iface enp3s0 inet manual

auto internet
iface internet inet dhcp
  pre-up    ip link add link enp3s0 name internet type vlan id 832 egress-qos-map 0:0 6:6
  pre-up    /etc/network/tc_for_livebox
  post-down ip link del internet
tc_for_livebox:
#!/bin/sh

# We need a qdisc to set filters
tc qdisc replace dev internet root handle 1: prio
tc filter del dev internet

# DHCP (raw sockets, do not specify "protocol ip")
tc filter add dev internet parent 1: prio 1 u32 \
     match ip protocol 17 ff \
     match ip dport 67 ffff \
     action skbedit priority 0:6
# ARP
tc filter add dev internet parent 1: prio 2 protocol 0x806 u32 \
     match u32 0 0 \
     action skbedit priority 0:6
# IGMP
tc filter add dev internet parent 1: prio 3 protocol ip u32 \
     match ip protocol 2 ff \
     action skbedit priority 0:6
# ICMP
tc filter add dev internet parent 1: prio 4 protocol ip u32 \
     match ip protocol 1 ff \
     action skbedit priority 0:6
dhclient.conf:
option rfc3118-authentication code 90 = string;
interface "internet" {
  timeout 60;
  retry 1;
  select-timeout 0;
  send vendor-class-identifier "sagem";
  send user-class "+FSVDSL_livebox.Internet.softathome.Livebox4";
  # fti/xxxxxx identifier can be converted to hexadecimal with:
  #  echo -n 123456 | od -A n -t x1
  send rfc3118-authentication 00:00:00:00:00:00:00:00:00:00:00:1a:09:00:00:05:58:01:03:41:01:0d:66:74:69:2f:xx:xx:xx:xx:xx:xx:xx;
  request subnet-mask, routers,
          broadcast-address,
          dhcp-lease-time, dhcp-renewal-time, dhcp-rebinding-time,
          rfc3118-authentication;
}
Life without Livebox:
Ping statistics, before and after:
rtt min/avg/max/mdev = 1.835/5.440/268.624/12.040 ms
rtt min/avg/max/mdev = 1.850/2.355/2.636/0.104 ms